

Cross Application in SAP ABAP
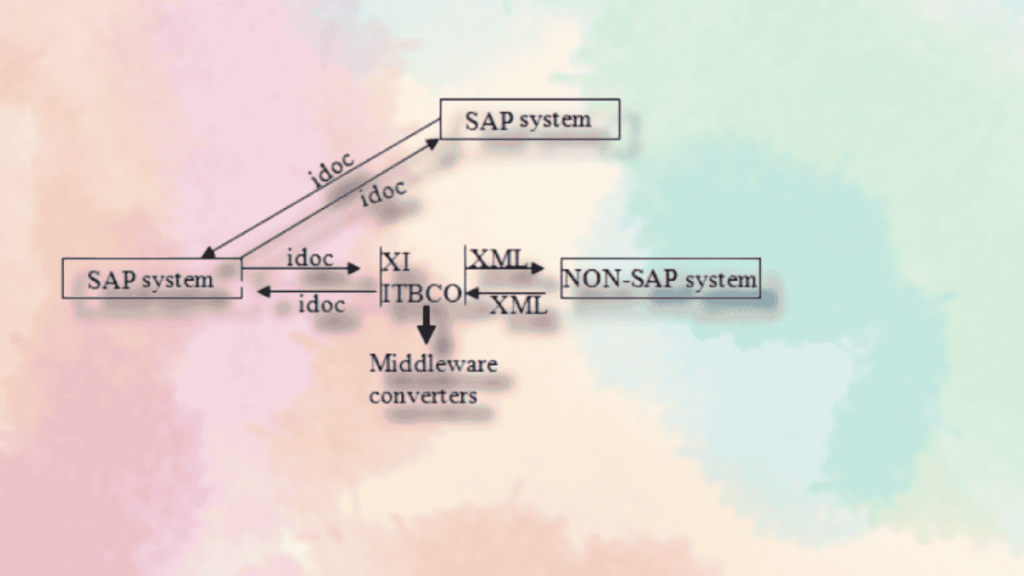
Cross application functionality in SAP ABAP is essential for achieving seamless communication and integration between different SAP modules such as Material Management (MM), Sales and Distribution (SD), Financial Accounting (FI), and Controlling (CO), as well as with external systems. This capability ensures cohesive operation across various enterprise functions.
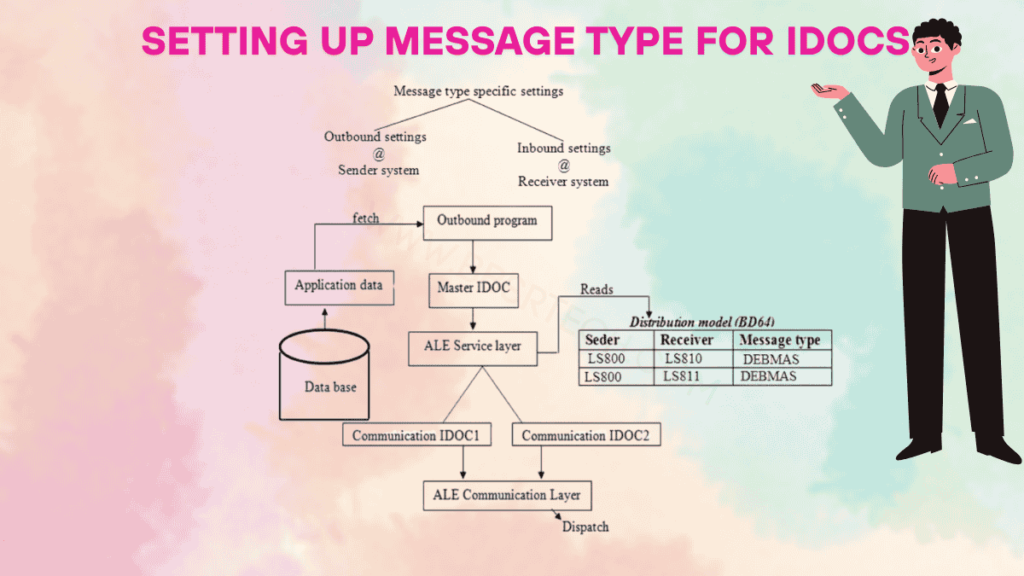
Irrespective of the receivers, the ABAPER's job in the sender system is to generate the IDoc.
The process of generating the IDoc is known as the outbound process.
Irrespective of the senders, the ABAPER's job in the receiver system is to collect the data from the IDoc.
The process of collecting the data from the IDoc is known as the inbound process.
Distributing the data :-

What is IDoc in SAP?
Within SAP environments, IDocs (Intermediate Documents) serve as the foundational framework for system-to-system data transfers. These standardized data containers facilitate seamless information exchange across both SAP and external platforms through structured document sharing.
SAP IDoc Runtime Environment
- It generates a unique Idoc number, which is 16 digit.
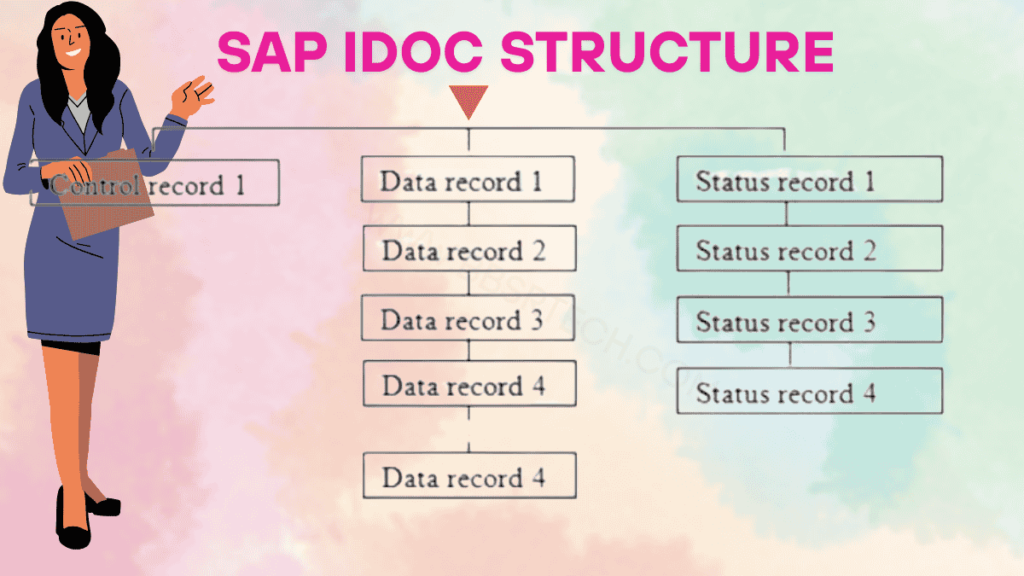
- It generates 3 types of records.
i. Control records
ii. Data records
iii. Status records
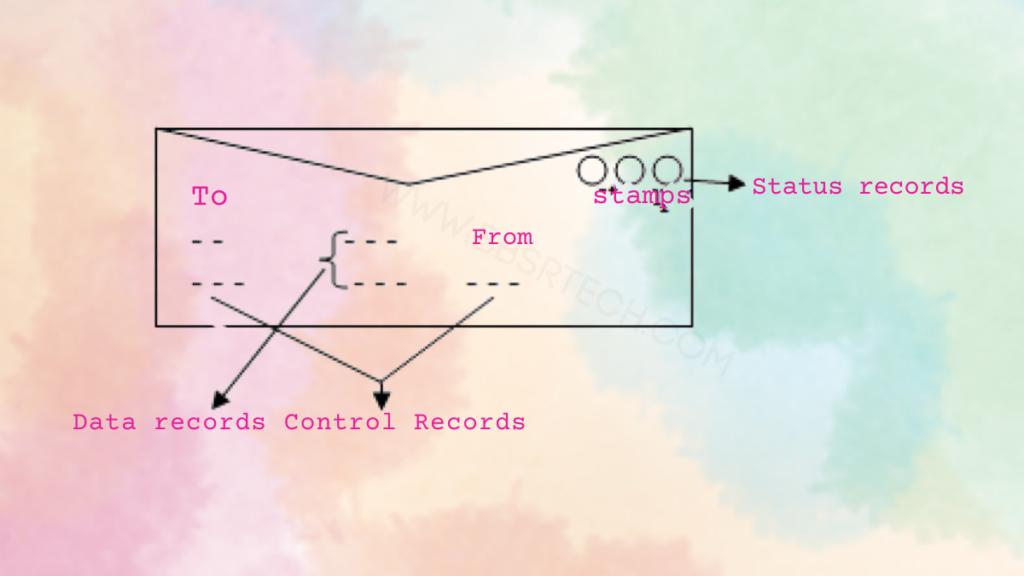
What is control record in idoc in sap
The control record serves as the foundational header component of every IDoc (Intermediate Document) in SAP.
i. Control record specifies the sender as well as receiver information.
ii. It generates only one control record.
iii. This information will be saved on EDIDC table in SAP.
What is Data record in idoc in sap
Data Records form the core content of an IDoc, carrying the actual business data being exchanged between systems. These records work alongside the Control Record (header) and Status Records (processing history) to complete the IDoc structure.
i. It specify the data which is send by the senders system.
ii. It generates any number of data records.
iii. This information will be saved on EDIDD table in SAP.
What is Status record in idoc in sap
Status Records in an IDoc (Intermediate Document) track the processing lifecycle of the document as it moves through SAP systems. These records provide a step-by-step audit trail, capturing success, failures, and system actions at each stage.
i.It generates status codes for each and every stage of transferring the data.
ii. It generates any number of status records.
iii. This information will be saved on EDIDS table.
Status codes are :
a. Outbound status codes (0-49)
b.Inbound status (50-75)
Note: – The linking between EDIC, EDIDD and EDIDS is the IDOC number.
SAP IDoc structure
Types of IDOCS in SAP
Standard Idoc
1. BASIC type : Standard Idoc and Custom Idoc
2. Extension > Standard Idoc + Custom Idoc
Standard Idoc
If you want to send as well as receives the standard data base table information then we go for standard idoc.
KNA1
——–
KUNNR
NAME1
ORT01
Custom Idoc
If you want to send as well as receives the custom table information then we go for custom item.
ZBBS
——–
EID
ENAME
ESAL
Extension Idoc
If you want to send as well as receives the additional fields information of standard data base table along with standard fields information then we go for extension Idoc.
KNA1
=====
KUNNR
NAME1
ORT01
| |
+
ZBBS_additionla_fileds CGST
SGST
Note: – IDOC is the collection of segments. Each segment is the collection of fields.
Characteristics of an IDOC
Communication between one system to another system is nothing but communication between one client of sender system to another client of receiving system. Each participated system is called one logical system.
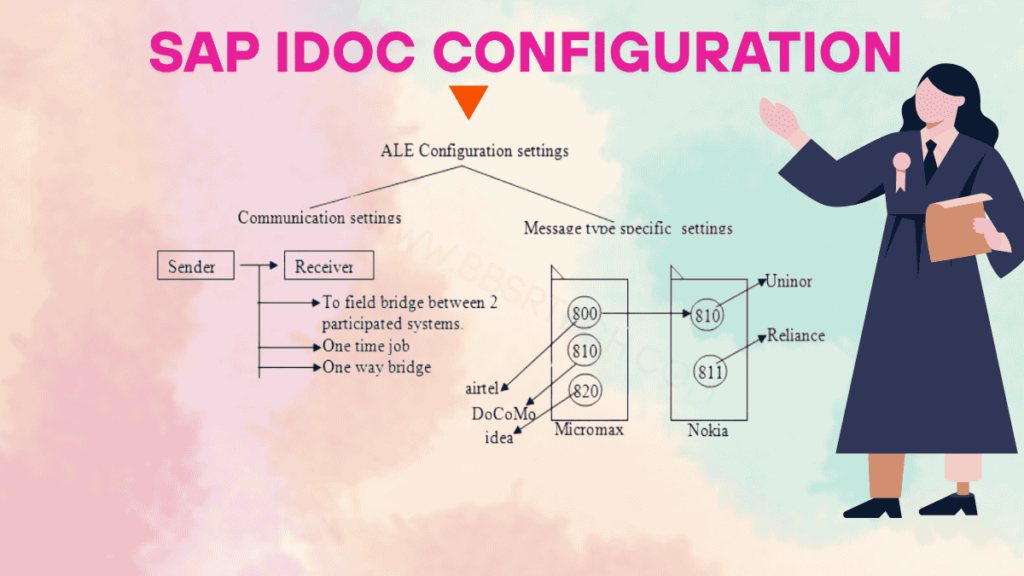
Steps to establish the communication settings
1. Define logical system (SALE)
2. Assign client to logical system (SCC4)
3. Maintain RFC destination details (SM59)
Note: – In the real time communication settings are established by BASIS people.
Object : If the receiver is available in following address & he wants customer K7788 details.
Sender details are:
Client 800
User : SAPUSER
Password : welcome123
Logical system : LS800.
Receiver details are:
Client 810
User : SAPUSER
Password : india123
Logical system : LS810.
Note : Before sending any data from sender to receiver system, first we need to establish the communication settings from sender to receiver system.
Steps to define logical system: -
Steps to Define Logical System
| System Code | Description |
|---|---|
| LS800 | Sender logical system |
| LS810 | Receiver logical system |
Steps to assign client to logical system: -
Steps to maintain RFC destination details: -
- Client: 810
- User: SAPUSER
- Password: india123
- There are no interested receivers available in the distribution model.
- There is a communication settings problem.
Some of the Standard message types
| TCODE | MESSAGE TYPE | IDOC TYPE | SHORT DESCRIPTION |
|---|---|---|---|
| BD10 | MATMAS | MATMAS01 | Get Material |
| MATMAS02 | Get Material | ||
| MATMAS03 | Get Material | ||
| MATMAS04 | Get Material | ||
| MATMAS05 | Get Material | ||
| BD11 | MATMAS | MATMAS05 | Get Material |
| BD12 | DEBMAS | DEBMAS01 | Get Customer |
| DEBMAS02 | Get Customer | ||
| DEBMAS03 | Get Customer | ||
| DEBMAS04 | Get Customer | ||
| DEBMAS05 | Get Customer | ||
| DEBMAS06 | Get Customer | ||
| BD14 | CREMAS | CREMAS01 | Send Vendor |
| CREMAS02 | Send Vendor | ||
| CREMAS03 | Send Vendor | ||
| CREMAS04 | Send Vendor | ||
| CREMAS05 | Send Vendor | ||
| BD15 | CREMAS | CREMAS05 | Get Vendor |
SAP ALE IDOC configuration steps
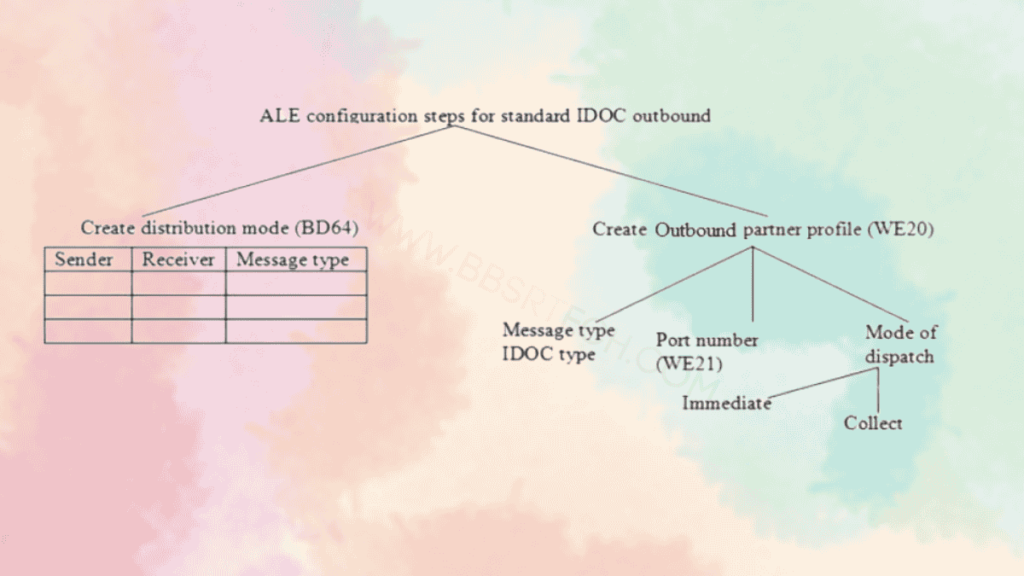
Steps to Create Distribution Model
- Execute
BD64. - Click on change mode.
- Click on create model view in the application toolbar.
- Provide the short description (
distribution) and technical name (DBCM1), then press Enter. - Select the distribution model which is listed last.
- Click on add message type in the application toolbar.
- Provide sender (
LS800), receiver (LS810), and message type (DEBMAS), then press Enter. - Repeat the same step for all additional receivers and click Save.
Port number: –
Port number is used to specify the way of transferring the data.
Types of ports in IDOC :-
- TRFC port > ALE/IDOC
- File port > LSMW, EDI/IDOC
- Internet port > Web Apps
- XML port > Java
Steps to Create the Port Number
- Execute
WE21. - Select the Transactional RFC.
- Click on Create (F7) and press Enter.
- The system automatically generates a port number (e.g.,
A000000055). - Provide a short description (e.g.,
port number) and the RFC destination (e.g.,LS810), then click Save.
Steps to Create Outbound Partner Profile
- Execute
WE20. - Select the partner type LS. Click on Create and provide the partner number (e.g.,
LS810). - Click on Save. Then click on the Create Outbound Parameter ( + ) button.
- Provide the message type (e.g.,
DEBMAS). - Provide the port number (e.g.,
A000000055). - Select the radio button Transfer IDOC Immediately. Then select the basic type (e.g.,
DEBMAS06). - Click on Save.
Steps to Create Customer
- Execute
XD01. - Select the account group (e.g., Bill to Party).
- Provide the customer number (e.g.,
57688). - Press Enter.
-
Provide the following details:
- Name:BBSR Tech
- Search Term: BB
- Street: London
- Country: UK
- Click on Save.
Steps to Send Customer Details
- Execute
BD12. - Provide the customer number (e.g.,
57788). - Provide the message type/output type (e.g.,
DEBMAS). - Specify the target system/logical system (e.g.,
LS810). - Click on Execute.
- The system generates 1 master IDoc and 1 communication IDoc.
Steps to Check or Test the IDoc
- Execute
WE02orWE05orWE09. - Provide the logical message type (e.g.,
DEBMAS). - Enter the partner number (e.g.,
LS810) and click Execute. - Observe the runtime components: Control Record, Data Record, and Status Record.
- Expand the status records and check for status code
03(Success).
After receiving status code
03, execute the standard program RBDMOIND.- If status code changes from
03to12, the IDoc has successfully reached the destination. - If status code remains
03, the IDoc is still in the tRFC queue. - If status code turns to
11, the IDoc is damaged in the queue.
What is Inbound IDoc Process in SAP
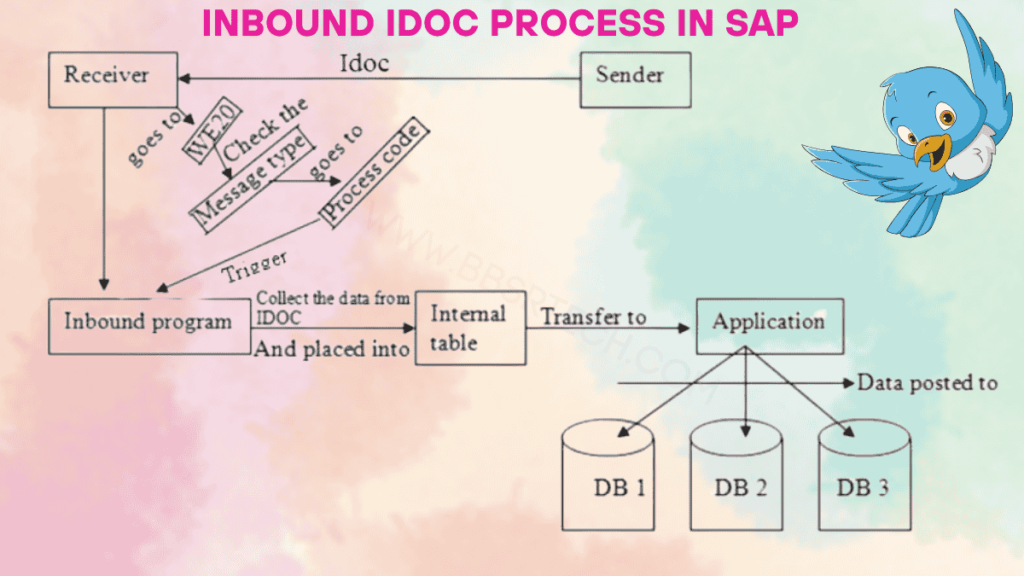
After the IDoc reaches the receiver system, it is processed through the inbound partner profile (Transaction WE20).
The system checks for the corresponding message type. If the message type is available, it proceeds to the defined process code.
Against this process code, the related inbound program (function module) is triggered.
The inbound program reads the data from the IDoc and places it into an internal table. From this internal table, data is transferred to the relevant application layer, and then the application posts the data into the appropriate database tables.
However, inbound programs must be developed as function modules because the interface parameters (such as
IMPORT, EXPORT, CHANGING, etc.) are standardized across all message types.
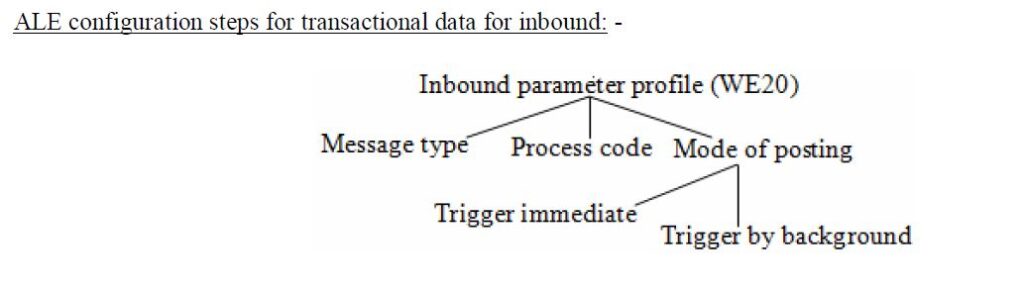
ALE Configuration for Inbound IDoc in SAP: Step-by-Step Guide
Before creating the inbound partner profile for the first time, ensure the following steps are completed:
- Define logical systems (This is not required if you are working within the same server).
- Assign the client to the logical system.
function module that will process the inbound IDoc.
In the receiver system 810 client: - Steps to assign client to logical system:
- Execute
SCC4. - Click on Change Mode.
- Press Enter and select the client
810. - Click on Details.
- Provide the logical system name (e.g.,
LS810) and click Save.
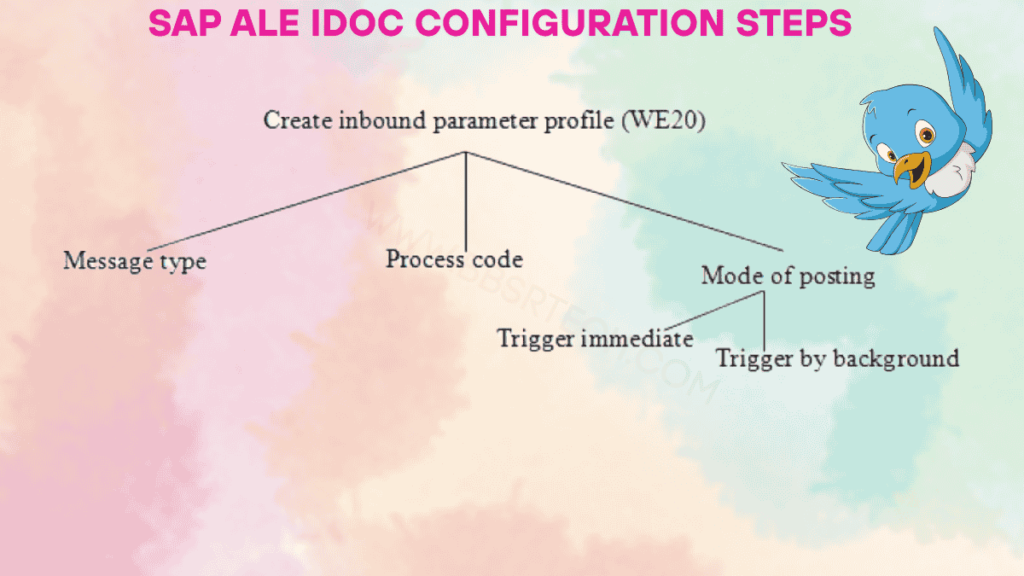
Steps to Create Inbound Partner Profile
- Execute
WE20. - Select the partner type LS.
- Click on Create (F5).
- Provide the partner number (e.g.,
LS800) and click Save. - Click on Create Inbound Parameter.
- Provide the message type (e.g.,
DEBMAS). - Select the process code (e.g.,
DEBM) and click Save.
Steps to Test / Check the IDoc
- Execute transaction
WE02orWE05. - Provide the message type:
DEBMAS. - Enter the partner number:
LS800and click Execute.
Steps to Reprocess the IDoc
- Execute transaction
BD87. - Provide the IDoc number (e.g.,
85001). - Click Execute and select the error IDoc.
- Click on Process.
RSEOUT00 to dispatch the collected IDocs to the relevant receiver system.
RBDAPP01 to post the collected IDocs to the respective database tables.
03, you should execute the standard program
RBDMOIND. - If status changes to
12, the IDoc has successfully reached the destination. - If it remains
03, the IDoc is still in the TRFC queue. - If it turns to
11, the IDoc is damaged in the queue.

Types of Distributing the Data
- Send entire information
- Send changes only (Change Pointer Technique)
- Get entire information
Change Pointer Technique
The Change Pointer Technique is used to send only the changes made to master data from the sender system to the receiver system. This approach helps reduce unnecessary data transfers by identifying and transmitting only modified records.
Process flow of change pointer technique: -
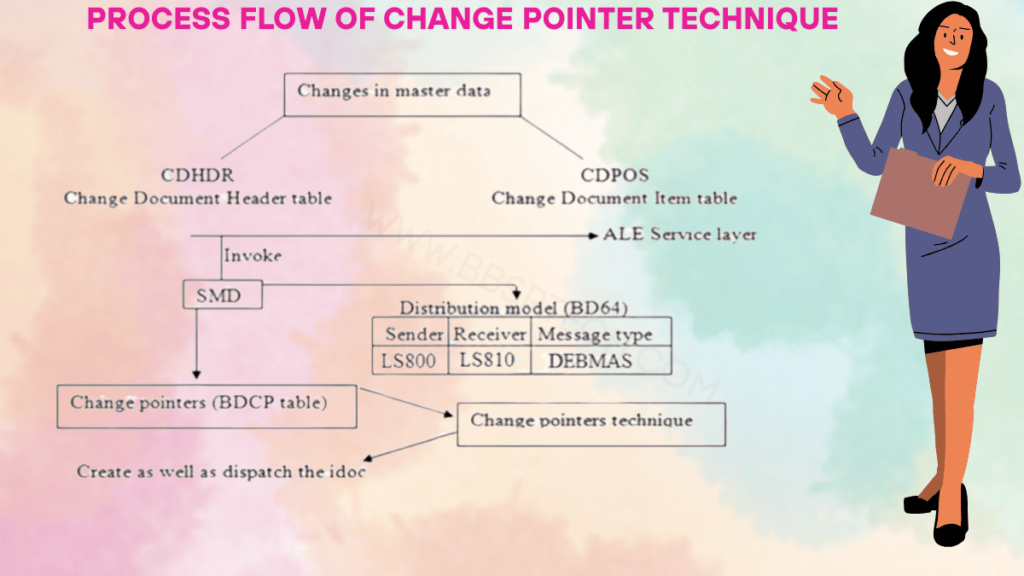
Whenever changes occur in the master data, the standard SAP system automatically creates a change document. The ALE service layer then invokes the SMD (Shared Master Data). The SMD reads the distribution model and identifies the interested receivers.
If any receiver is available, SAP generates change pointers for the change document. These
change pointers are stored in the BDCP table.
The change pointer technique reads the change pointers, generates the corresponding IDoc(s), and dispatches them to the appropriate receiver system.
ALE Configuration Steps for Change Pointer Technique
-
ALE configuration for outbound IDoc:
Create the distribution model usingBD64and configure the outbound partner profile inWE20. -
Activate the Change Pointer Technique:
Use transactionBD61to enable change pointer functionality. -
Activate the Message Type:
Use transactionBD50to activate the message type relevant to the master data. -
Generate and Dispatch the IDoc:
Use transactionBD21to generate and send the IDocs based on change pointers.
Steps to Activate Change Pointer Technique
- Execute BD61.
- Select the checkbox Change pointers activated.
- Click on Save.
Steps to Activate Message Type
- Execute BD50.
- Click on Position and provide the message type DEBMAS.
- Select the Activate checkbox for DEBMAS.
- Click on Save.
Steps to Change the Customer
- Execute XD02.
- Provide the customer number 57789 and press Enter.
- Make the necessary changes.
- Click on Save.
Steps to Generate and Dispatch IDOC for Change Pointers
- Execute BD21.
- Provide the message type DEBMAS.
- Click on Execute.
- Check the IDoc in WE02 or WE05.
Note: Change pointer technique is always maintained on the sender system for master data.
Note: These changes are automatically reflected in the receiver system.
Some of the Standard Requesting Message Types
| Application | Message Type | Requesting Message Type |
|---|---|---|
| Vendor | CREMAS | CREFET |
| Customer | DEBMAS | DEBFET |
| Material | MATMAS | MATFET |
ALEREQ01 is the IDOC type used for any requesting message type.
EDIMSG is the standard database table that contains all message types, IDOC types, and requesting message types.

STEP ( I ) – Receiver System 810
Steps to Maintain RFC Destination (SM59):
- Execute
SM59. - Select ABAP connections.
- Click on Create.
- Provide RFC Destination:
LS800. - Provide Short Description: Receiver to sender.
- Go to Logon & Security tab.
- Provide sender logon details:
- Client:
800 - User:
sapuser - Password:
india123
- Client:
- Click Save.
- Click Connection Test.
- Click Remote Logon.
Steps to Create Distribution Model (BD64):
- Execute
BD64. - Click on Change Mode.
- Click on Create Model View.
- Provide Short Description and Technical Name, then press Enter.
- Select the last distribution model entry.
- Click on Add Message Type from the toolbar.
- Provide:
- Sender:
LS810 - Receiver:
LS800 - Message Type:
DEBFET
- Sender:
- Press Enter and click Save.
Steps to Create Port Number (WE21):
- Execute
WE21. - Select Transactional RFC.
- Click on Create, press Enter.
- Provide Short Description, Port Number, and RFC Destination:
SP800. - Click on Save.
Steps to Create Outbound Partner Profile (WE20):
- Execute
WE20. - Select Partner:
LS800. - Click on Create Outbound Parameter (+ symbol).
- Provide:
- Message Type:
DEBFET - Port Number:
A000018
- Message Type:
- Select Transfer IDOC Immediately.
- Select Basic Type:
ALEREQ01. - Click Save.
Steps to Get the Customer (BD13):
- Execute
BD13. - Provide:
- Customer Number:
57790 - Message Type:
DEBMAS
- Customer Number:
- Click Execute.
Steps to Check the IDOC (WE02):
- Execute
WE02. - Provide required selection criteria.
- Click Execute.
STEP (II) – Sender System 800 Client
Steps to Create Inbound Partner Profile:
- Execute
WE20. - Select the partner:
LS810. - Click on Create Inbound Parameter.
- Provide Message Type:
DEBFET. - Select Process Code:
DEBM. - Click Save.
Steps to Check the IDoc:
- Execute
WE05. - Provide:
- Message Type:
DEBFET - Partner Number:
LS810
- Message Type:
- Click Execute.
Now that the system is ready, reprocess the IDoc using transaction
BD87.
STEP (III) and STEP (IV)
The requested data is automatically sent from the sender system to the receiver system and posted successfully.
Working with Transactional Data
Using the Message Control Technique, we can send transactional data. Whenever functional users or end users create and save transactional data, the system automatically generates and dispatches the IDoc.
ALE Configuration Steps for Transactional Data:
- Provide the output medium as ALE for the application.

Object: Configure ALE to Send and Receive Purchase Order Information
Steps to Provide Output Medium as ALE for Purchase Order Application
- Execute
NACE. - Select the purchase order application: EF.
- Click on Output Types.
- Select the output type provided by functional team.
- Double-click on Processing Routines in the left panel and observe the medium.
- If the ALE medium isn’t available:
- Click on Change Mode.
- Select the EDI medium.
- Click Copy from the application toolbar.
- Set transaction medium to Distribution (ALE) instead of EDI.
- Click Enter.
- Create the Distribution Model.
Steps to Create Outbound Partner Profile with Message Control
- Execute
WE20. - Select the partner.
- Click on Create Outbound Parameter.
- Provide:
- Message Type:
ORDERS - Port Number:
A000075
- Message Type:
- Select Transfer IDOC Immediate and Basic Type:
ORDERS05. - Click on the Message Control tab.
- Click Insert Row (+) and provide:
- Application: EF
- Message Type: NEU
- Process Code: ME10
- If you want to send changes also:
- Click Insert Row (+) again with same values.
- Select the checkbox Change Message.
- Click Save.
Steps by Functional Team or End User
- Execute
ME21N. - Create the Purchase Order.
- Click on Messages in the application toolbar.
- Provide:
- Output Type: NEU
- Medium: ALE
- Partner Type: LS
- Partner Number
- Click on Further Data.
- Enter and select Dispatch Time: Send Immediately (When Saving the Application).
- Click Back and then Save.


Steps to Create Inbound Partner Profile in Receiver System
- Execute transaction
WE20. - Select the partner.
- Click on Create Inbound Parameter.
- Select the Message Type:
ORDERSP. - Select the Process Code:
ORDR. - Click on Save.
• To send Purchase Order details to a vendor, create an Outbound Partner Profile under partner type
LI (in WE20).• To send Sales Order details to a customer, create an Outbound Partner Profile under partner type
KU.• To send Payment details to a bank, create an Outbound Partner Profile under partner type
B.


